Using Apache JMeter to load test TM1 Contributor Applications

Judging by the amount of feedback I still get about the Java stress testing tool, load testing is really something everyone starts looking at once they’re facing any decent number of users in the system. This post will describe how to use JMeter to do a broader scope of testing, emulating the full user interaction with TM1 Contributor.
The Java script I used was designed for lock & contention testing and TM1 massively improved in this areas with Parallel Interaction and MTQ in the recent releases. And that Java testing didn’t include the user interface testing (TM1Web or TM1 applications), so when a client recently asked use to conduct performance testing that should answer the following questions:
- Infrastructure scalability — making sure that 100 online users inputting data in Contributor will not experience massive delays
- Network latency — testing that moving servers across the world will not hugely impact the response time for users
I thought that this is the chance to finally get my head around using JMeter for TM1 testing. As with TM1Web was completely rewritten in 10.2 (and I really must thank everyone involved in that, it’s a massive improvement), we needed to figure out how to configure and script Jmeter for this updated engine.
This post will describe how to setup JMeter scripts for TM1 Contributor application testing. This is quite technical and uses undocumented TM1 Application calls that are changing within TM1 releases, so I’ll focus on how to write and adjust such testing scripts as they also need to be adjusted for future releases and fix packs. I’d love to have a single storage of sample testing scripts for various versions, let me know if you have any ideas where to host them.
It’s a huge post (another thanks to Insight, I wouldn’t type it if I didn’t have to fly across Pacific), so a teaser on how everything looks in the end:

Overview
Just to cover the basics:
Apache JMeter
Apache JMeter is an open source software, a 100% pure Java application designed to load test functional behavior and measure performance. It was originally designed for testing Web Applications but has since expanded to other test functions.
There’s a number of similar tools (HP LoadRunner, NeoLoad, Selenium), Jmeter stands out from the crowd by being ubiquitous and free ) Having said that, if you already have any of the load testing tools in the organisation, you can use it, they all have a similar functionality. You can apply the same variable substitution logic that I describe below.
Download and install (if you call unzipping installation) JMeter from here. Then adjust jmeter\bin\user.properties file by adding this line:
CookieManager.save.cookies=true
this is required for Contributor to save FPM passport cookie that is required for authentication.
Run JMeter by running jmeter\bin\jmeter.bat (you can use the same JRE as TM1 if you running everything on one box, this will also save you the trouble of importing java certificates).
Install JMeter TM1 Plugin for nice visualisations and analysis. Follow the instructions on the Plugin page, we have enough to cover here without it :)
IBM Cognos TM1 Contributor
Just in case you didn’t know before it’s an TM1 web interface that combines data input with workflow capabilities. For this demonstration we’ll use the Go New Stores sample application that comes as a part of TM1 samples, see here on how to install it.
A typical Contributor user interaction looks like following (this is important as we want JMeter user testing scripts to follow the same steps):
- login to application portal
- select application (Go New Stores in our example)
- see the workflow tree, select a node and open TM1Web Contributor interface
- Take Ownership
- change data
- Commit
- Submit / Reject node
With this covered, let’s plunge on to
Load testing TM1 Contributor Applications with JMeter
All big things start small so we will start with
Recording a simple script
You can use something called JMeter proxy to capture all the web traffic between your browser and server. This allows us to ‘record’ all the actions we’re doing while logging in, opening applications, inputting data, etc.
To do so:
- Start Jmeter and select Templates
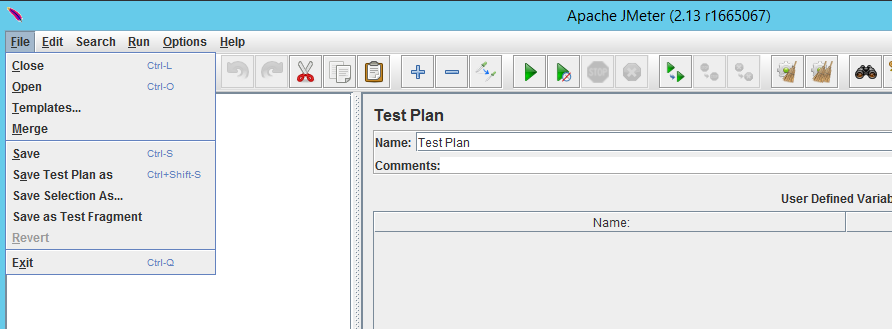
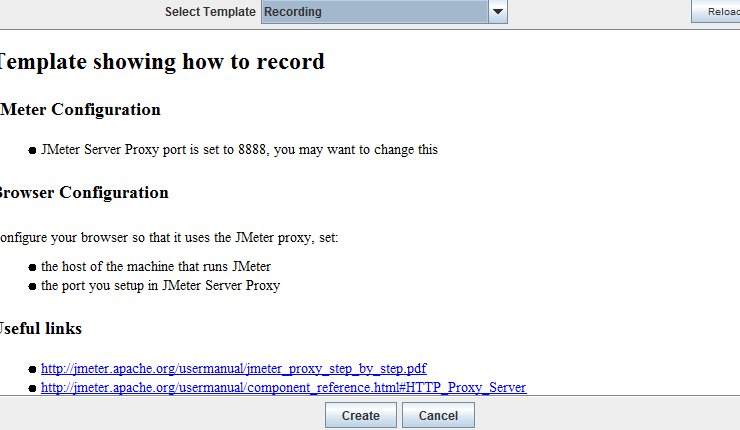
- Select Recording / Create
 Navigation Tree to the left definitely looks busier
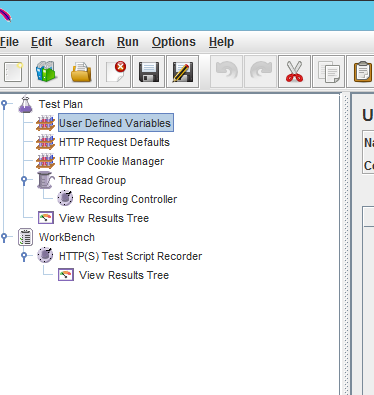
- We need the HTTP(S) Test Script Recorder, this is the proxy I’ve been talking about
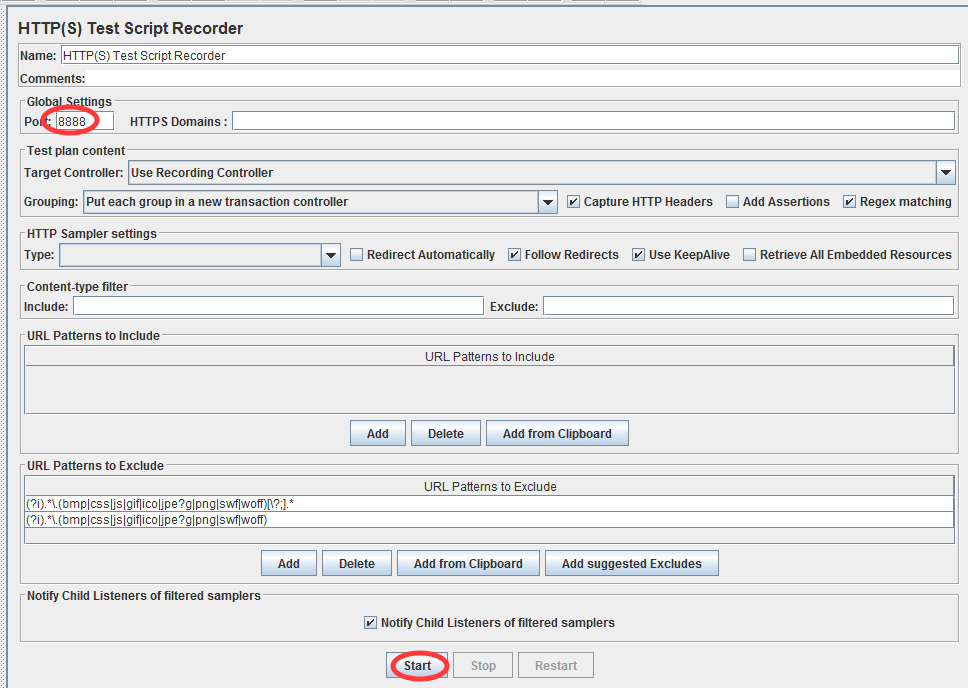 Once you’ve selected it, note the proxy port and press start button
 - In your browser, open the the data connection properties and say that you’re using a localhost:8888 as proxy server for all traffic:

- Now open a new browser session and navigate to your tm1 applications page (localhost:9510/pmpsvc in my example). If all goes well, you should see the login window and first recording elements should appear in your Recording Controller in JMeter
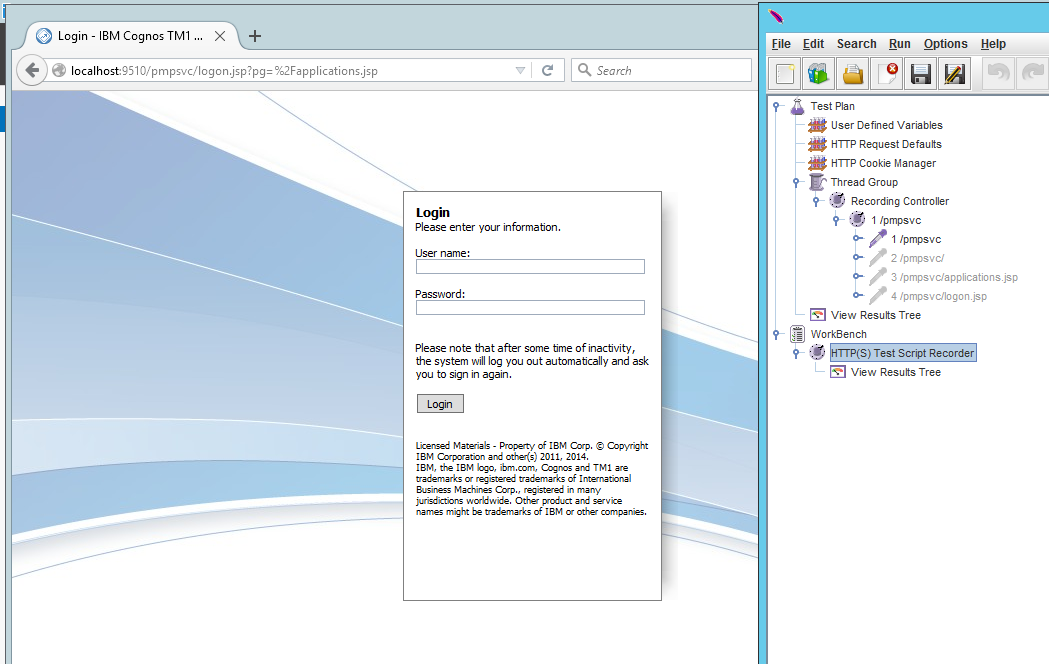
- Let’s login and see what happens
 . Note how on the login call you can see the username and password? This is what we’ll change / parametrise later. The next 2 calls are essentially ‘give me the list of applications i can access’ and you can see a very important parameter called FPM Passport cookie in them. Once we’ve authenticated on the step above, this cookie holds our session information details.
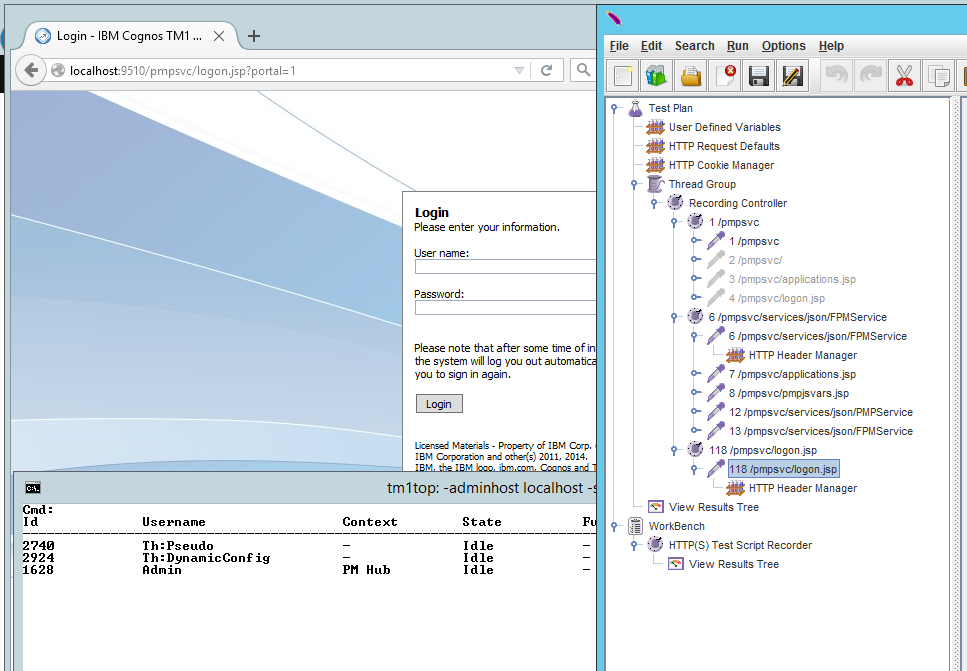
 - You can see in your TM1Top that we’ve logged in successfully (my other login is from Operations Console):

- And press Logoff to record this action as well (it’s highlighted in my screenshot and you can see only 1 session left in TM1Top):
 . These are all the actions we need for now, so stop the proxy server, save the script with any name you like.
And we’ll now try to do something ambitious — login as another user automatically.
Running a simple JMeter script
So we have our script from previous step so we can Run it 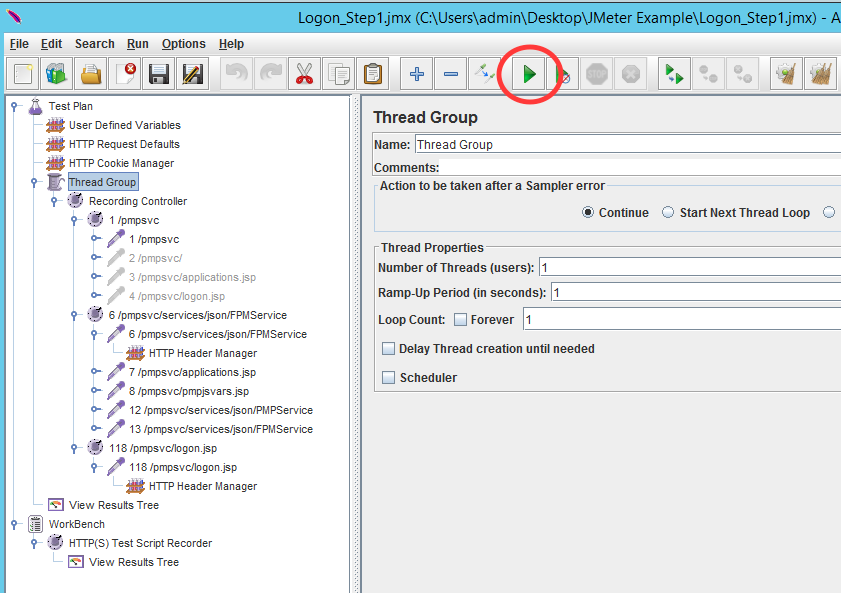
Select the View Results Tree so that we can see what happens: 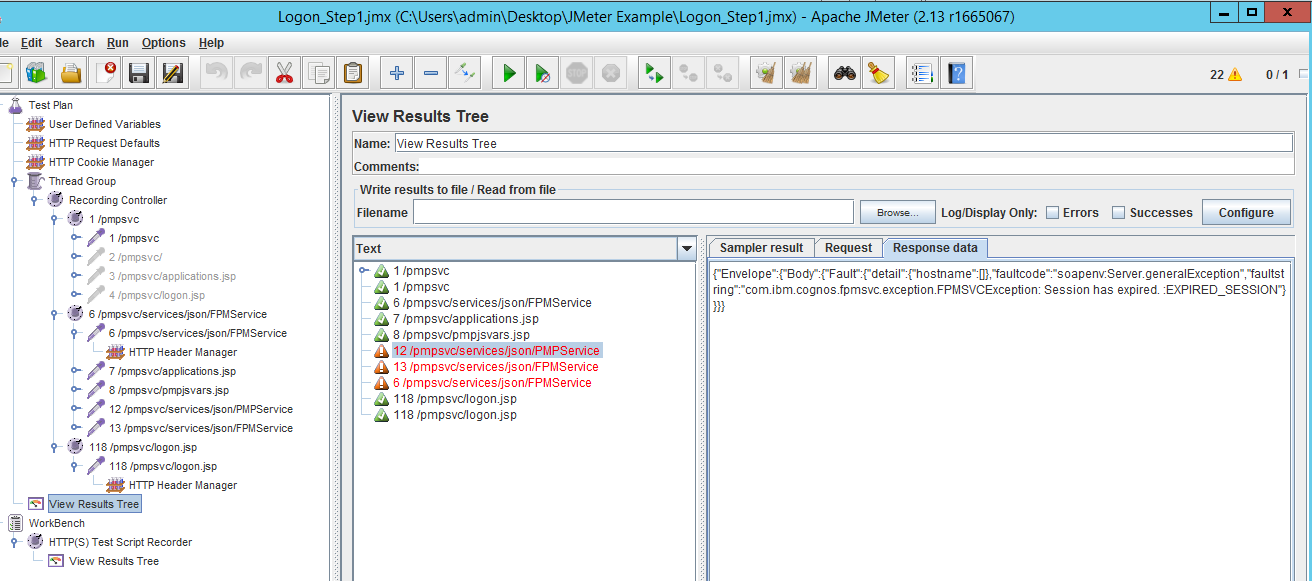
Surprise surprise, it failed ) We’ve got the Expired_Session error (oh, I spent a while with it, I must say), which basically says that something was wrong with our authentication.
View Results tree is very helpful as it shows you the request you’ve sent and response you’ve received, there is actually nothing else you need to start creating complex things )
So if we look at response of the login step: 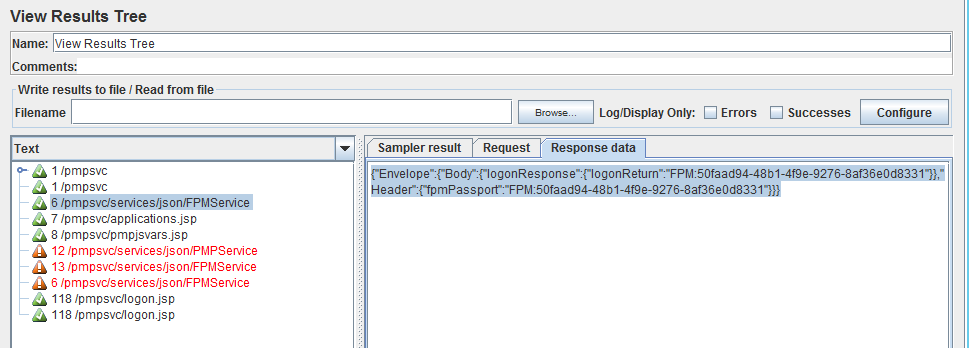
You can see that we’ve got a new FPM passport cookie value.
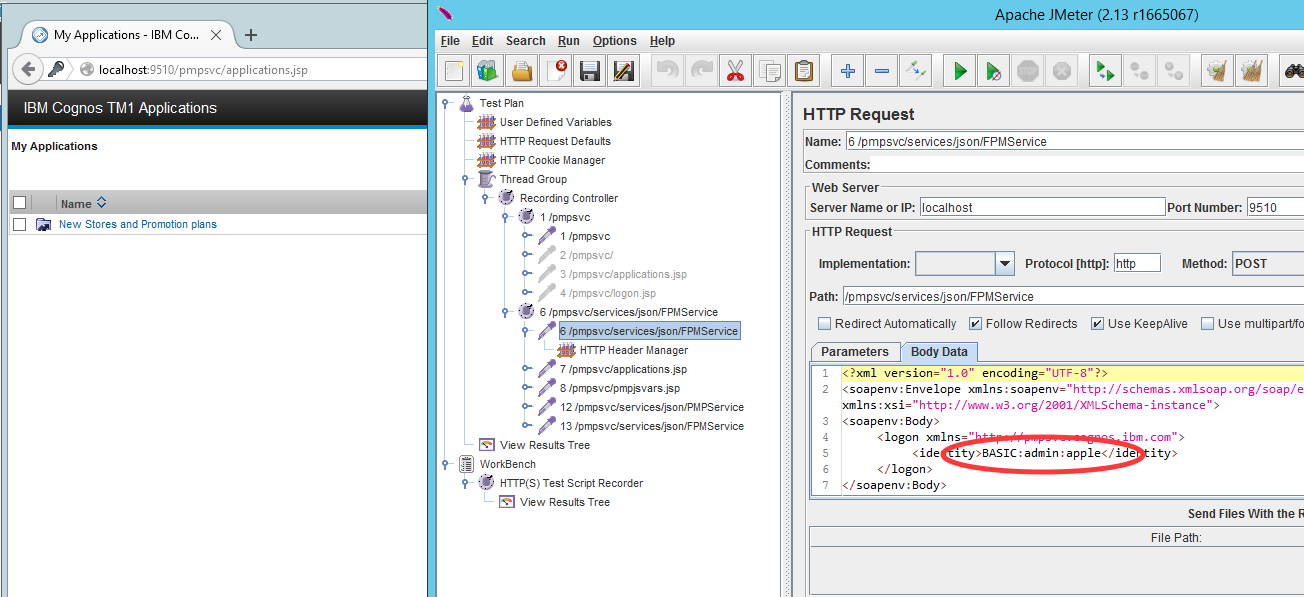
So if we look at the erroneous calls, we notice something interesting: 
Cookie value was absolutely correct (new one), but the request body contained something different — an old value from the time when we were recording the script.
So if we go to that step: 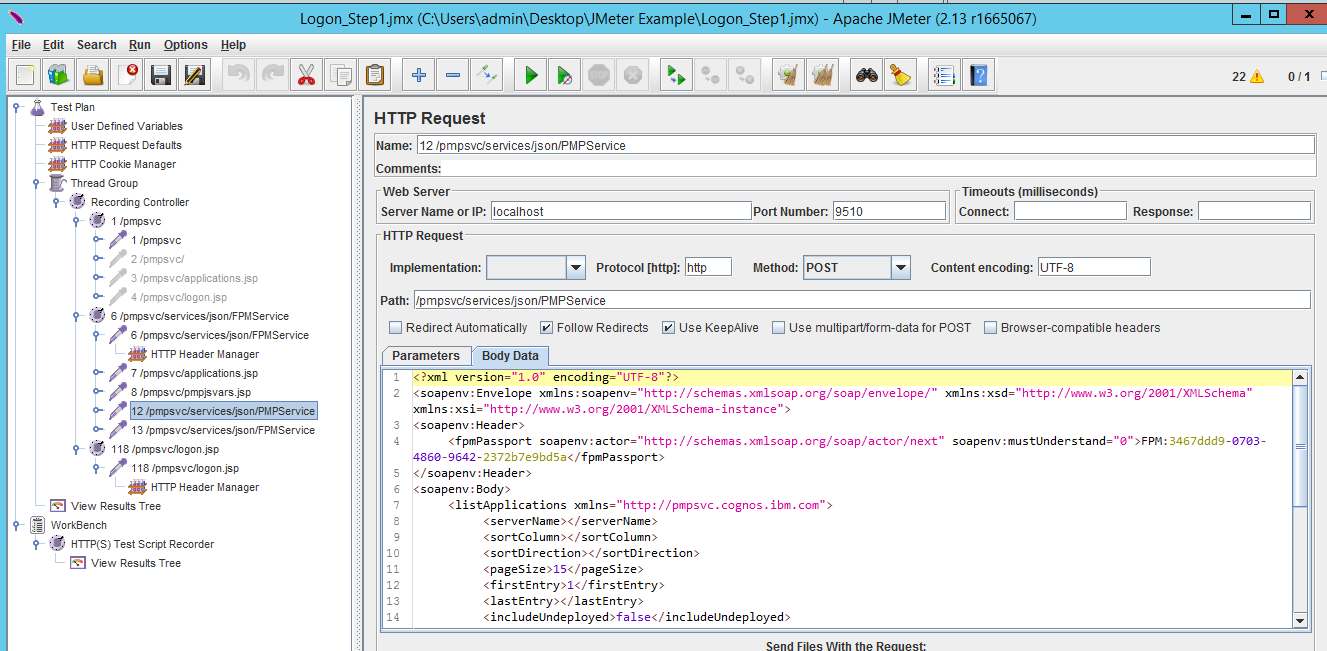
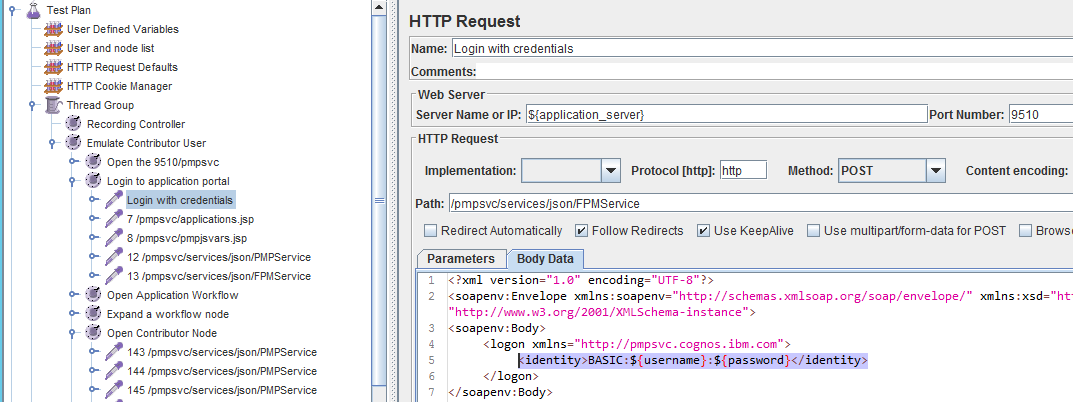
And replace the reference to FPM passport with a reference to the current Cookie Value, it should work better.
So we replace the whole FPM:…. string with
${_\_urldecode(${COOKIE\_fpmPassport})}
(and I usually do it via text editors as JMX files are human-readable XML files).
We end up with something like this: 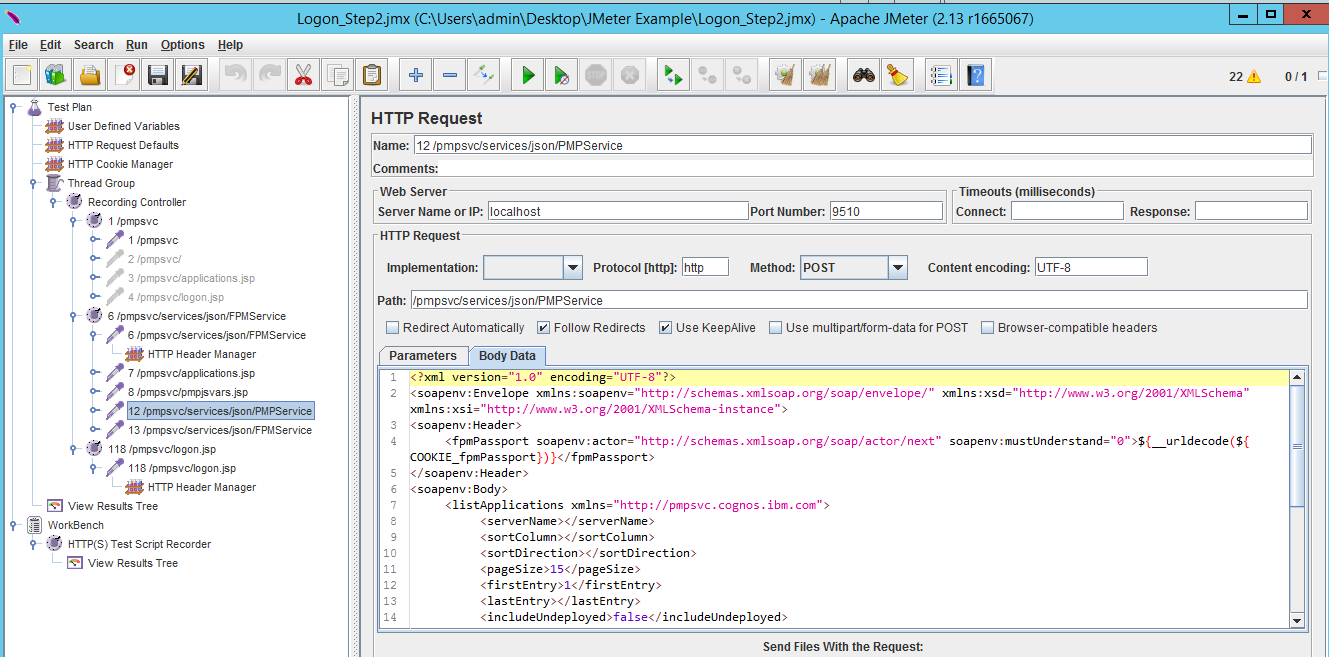
You can grab the updated script here.
Save and run it and see some different result: 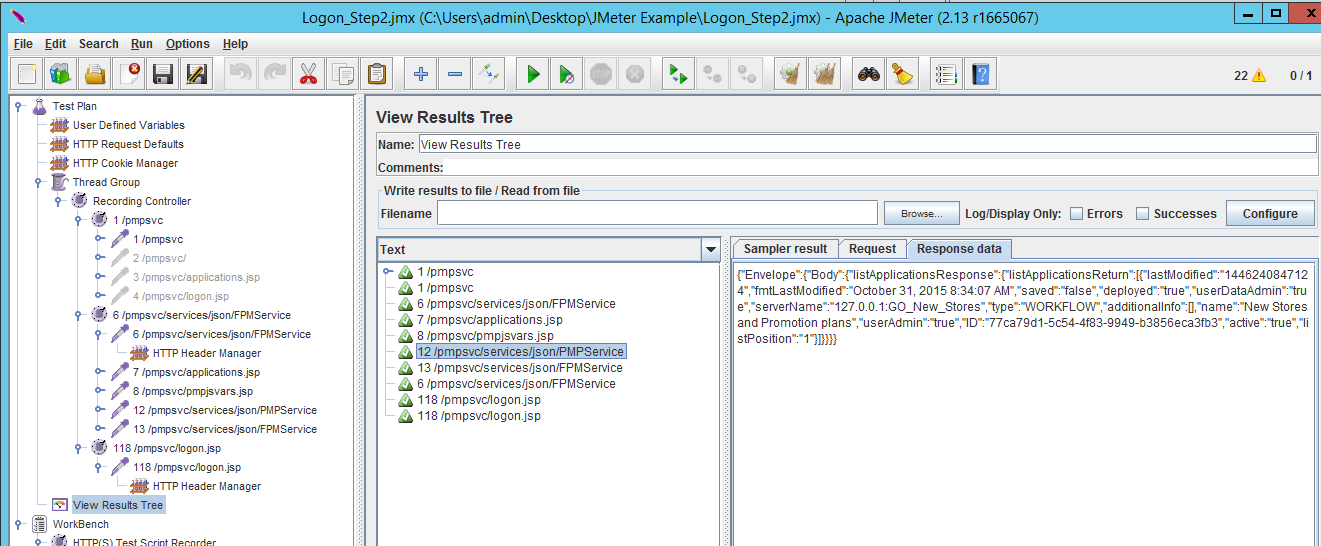
You can actually see that this first call returns all the TM1 applications available to this user (here’s a path for future randomisation if you want).
If you want to be able to see the user session (it does logon and of quite quickly), we can add a timer to slow things down so that you have a chance to capture it in TM1Top or JMeter TM1 Monitor.
You can download the final login script here.
Automating Data Entry script
Now let’s add the more interesting part of automation — data entry.
We will be recording the following:
- opening an application
- opening a node
- taking ownership
- inputting some data in the application
- committing data
- releasing ownership
Once you open the application, you can see the following number of calls recorded by JMeter: 
All of them will contain not only our good old friend FPM passport cookie, but also the application id (the guid of the planning application as shown the URL when you open it or stored in }tp_applications dimension). You can store it in a variable for it to make things more interesting. You can see that rest of the calls are related to showing the approval hierarchy nodes and their states.
Once you expand the application hierarchy, you’d have pretty much the same list of calls: 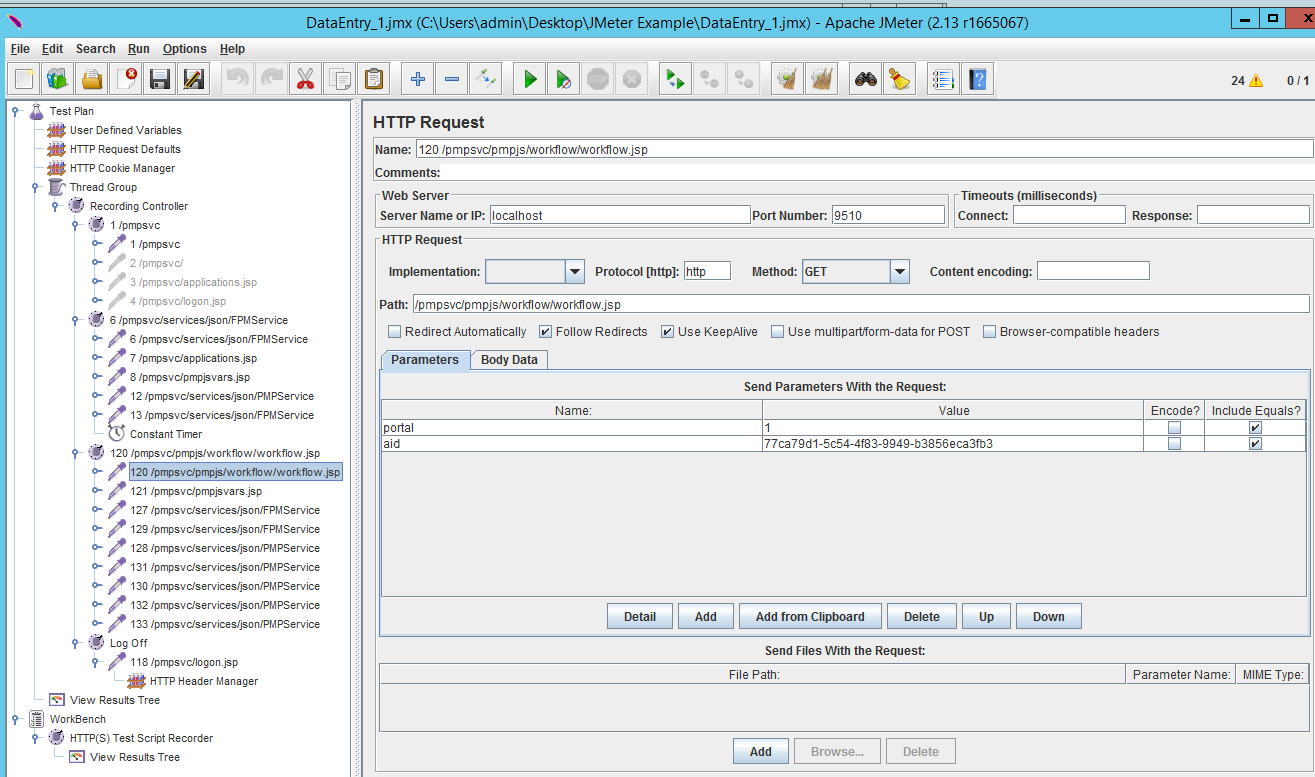
Let’s open Asia Pacific Node. This generates a huge number of new types of calls, with Contributor opening being the first big one: 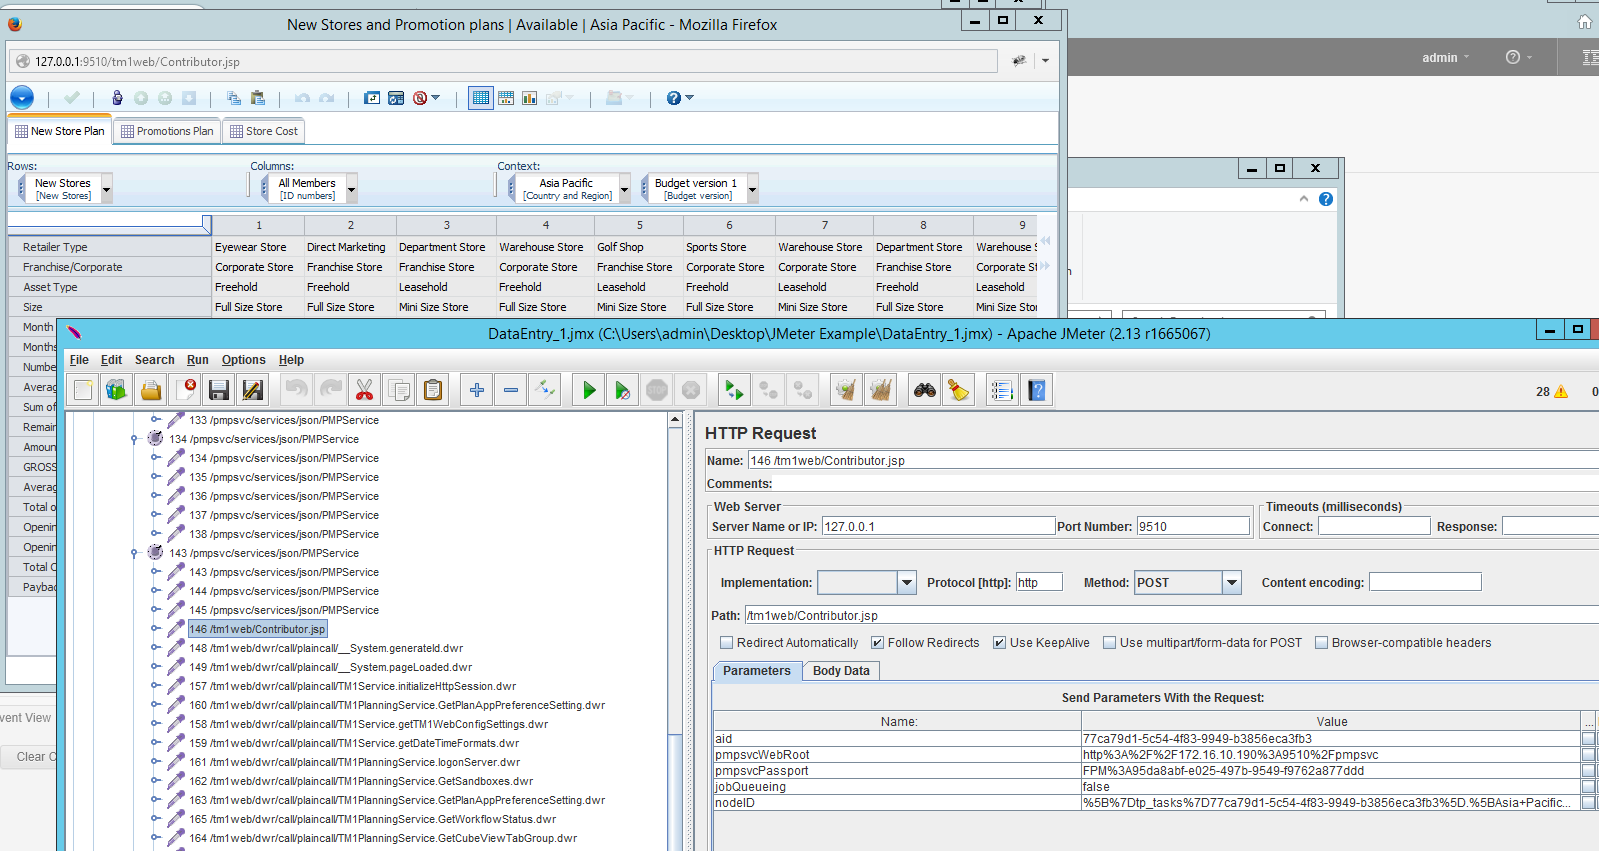
You can see that there are few parameters to this call:
- application id
- where TM1 Applications Server is located
- passport
- Node ID
We can parametrise all of that for future.
Let’s take ownership to see what action happens there: 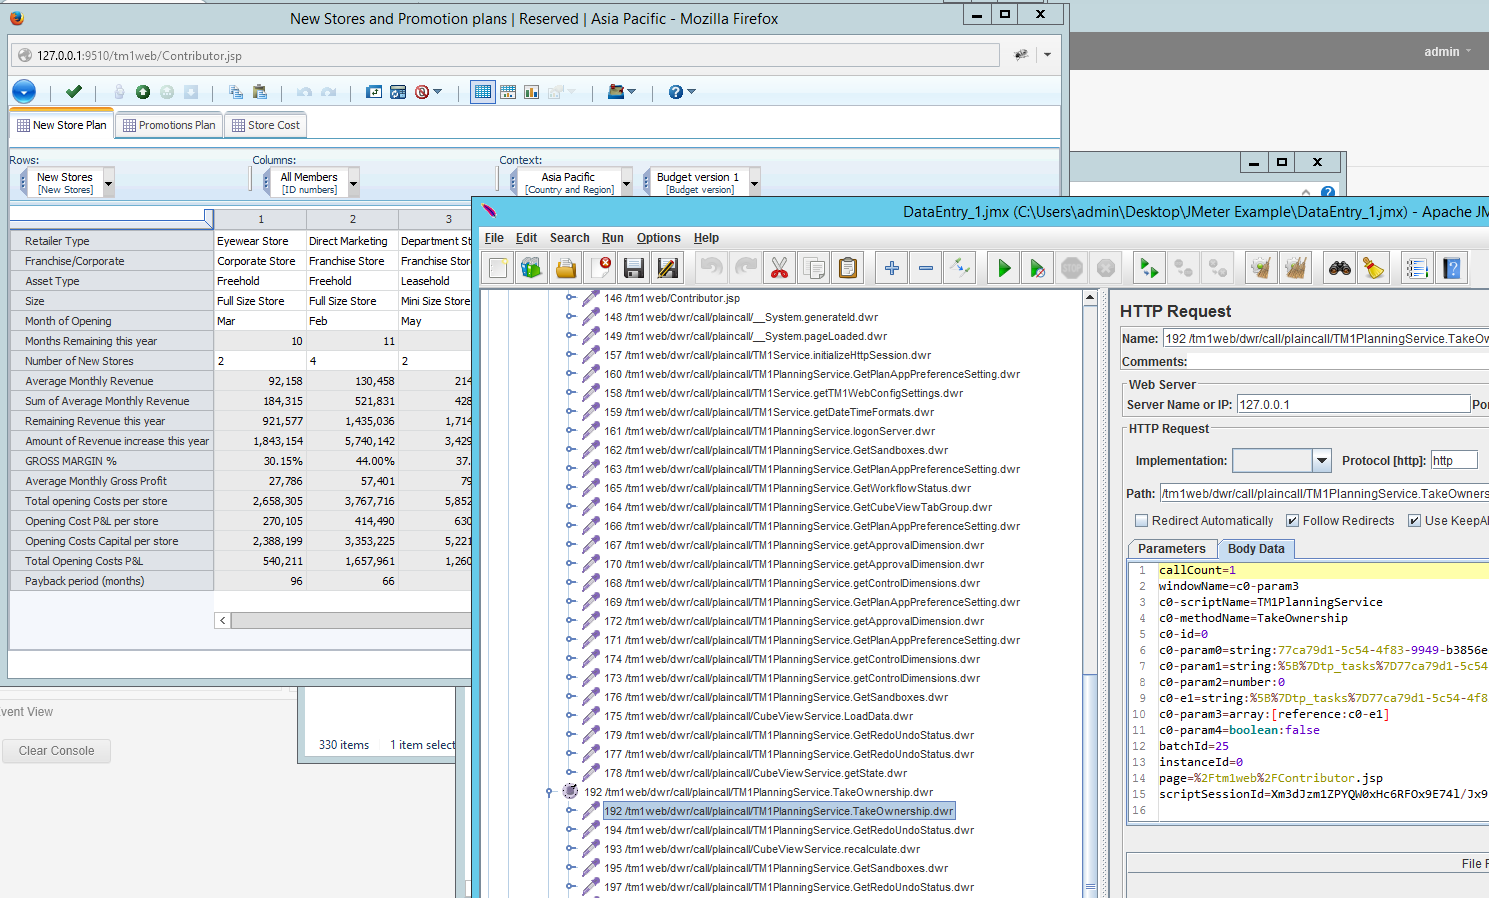
You can see that there’s a lot of parameters here as well and there’s something quite tricky called script session id there. We shall pause our recordings here and try to make this data_entry_1 script work. Ideally, we should be able to release ownership from web, run this script and see that admin now has ownership again.
What I usually do is mass replace all the FPM passport references in JMX source file using any text editor. So after that’s done, let’s run the script: 
This works.
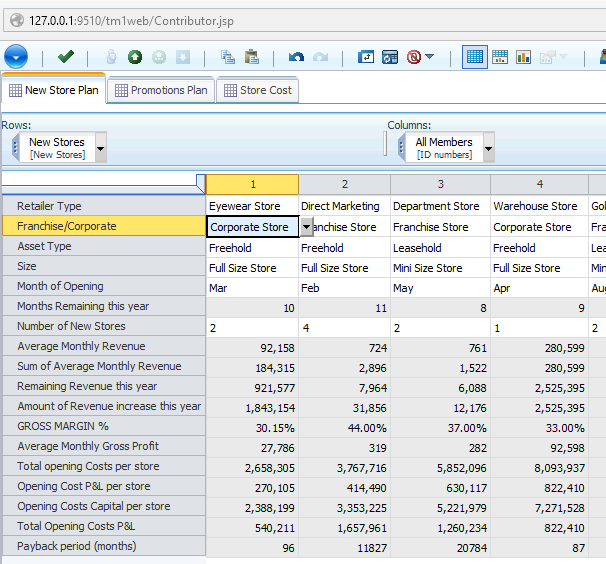
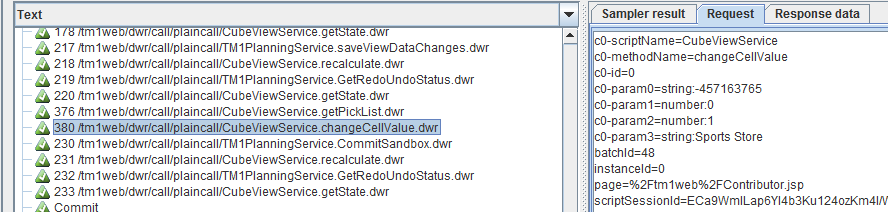
So now let’s change some data while we’re at it. First tab of the application contains mostly pick lists, but we want to start with something simpler like numbers, so let’s go to tab 3 ’Store Cost’ and input some values:
I’ve changed the 4th row in 1st column: 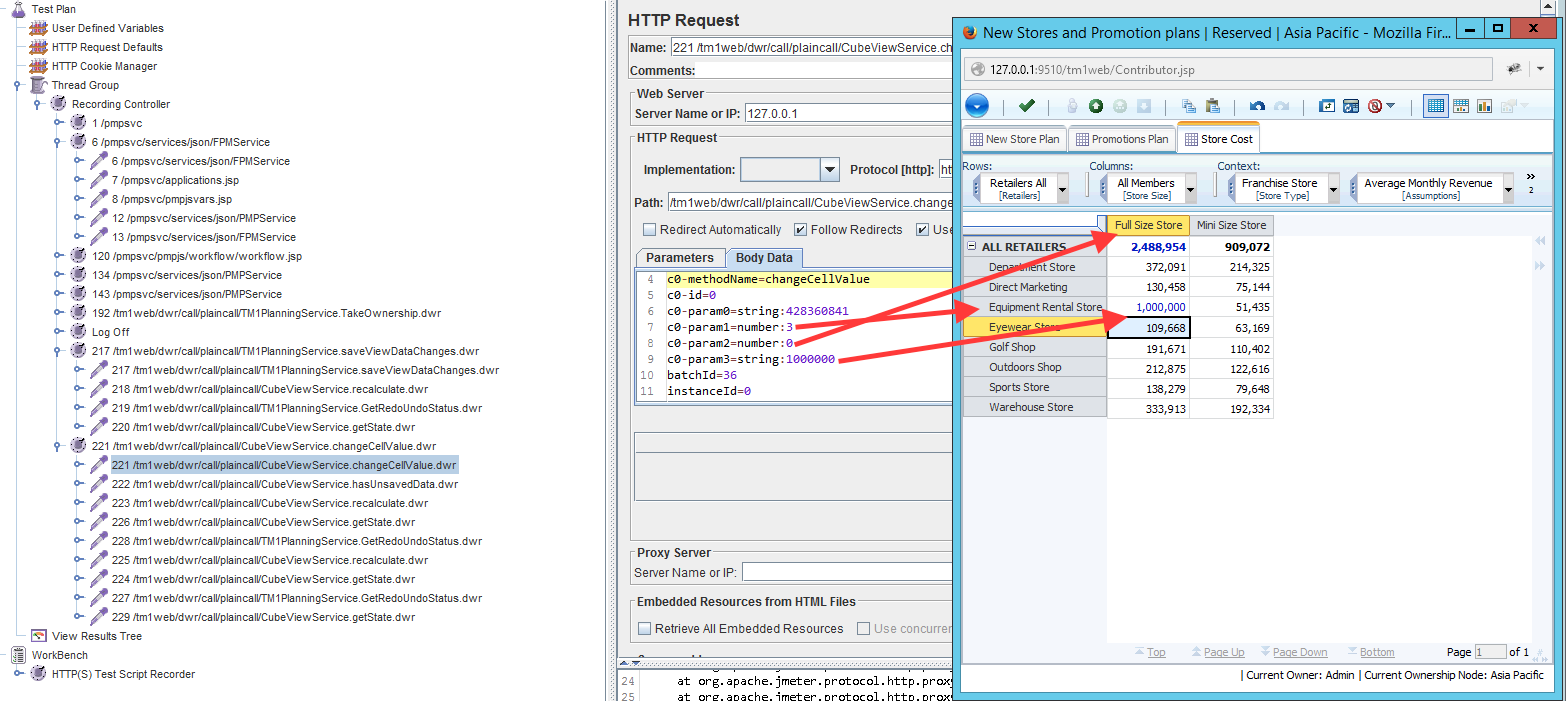
So param1 is row number, param2 is column number (starting from 0) and param 3 is value.
If we just run this script, we see no errors, but data doesn’t get updated. This is because of the script_session_id I was talking just before (and more things, but we’ll get there shortly).
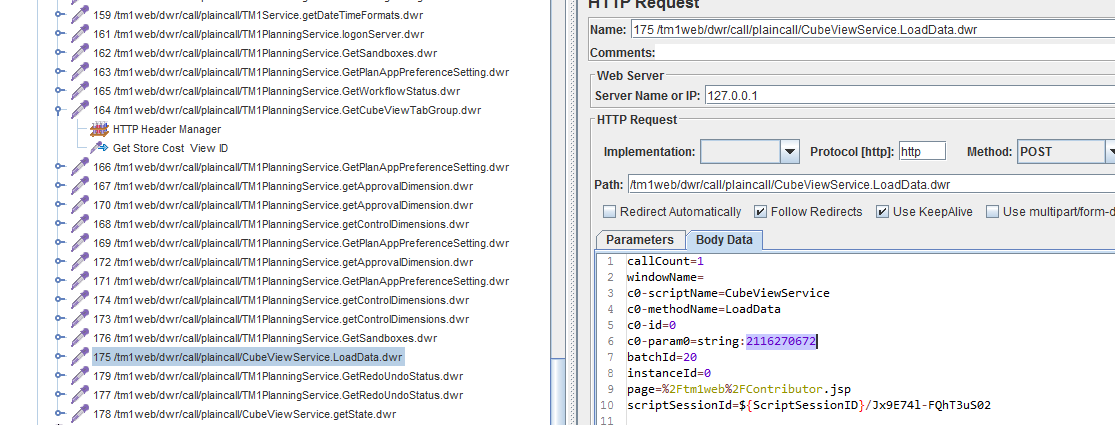
A good check to see if everything is working is to look at LoadData.dwr — this call should return all the visible values in the view to contributor, but at the moment the response is a bit less interesting: 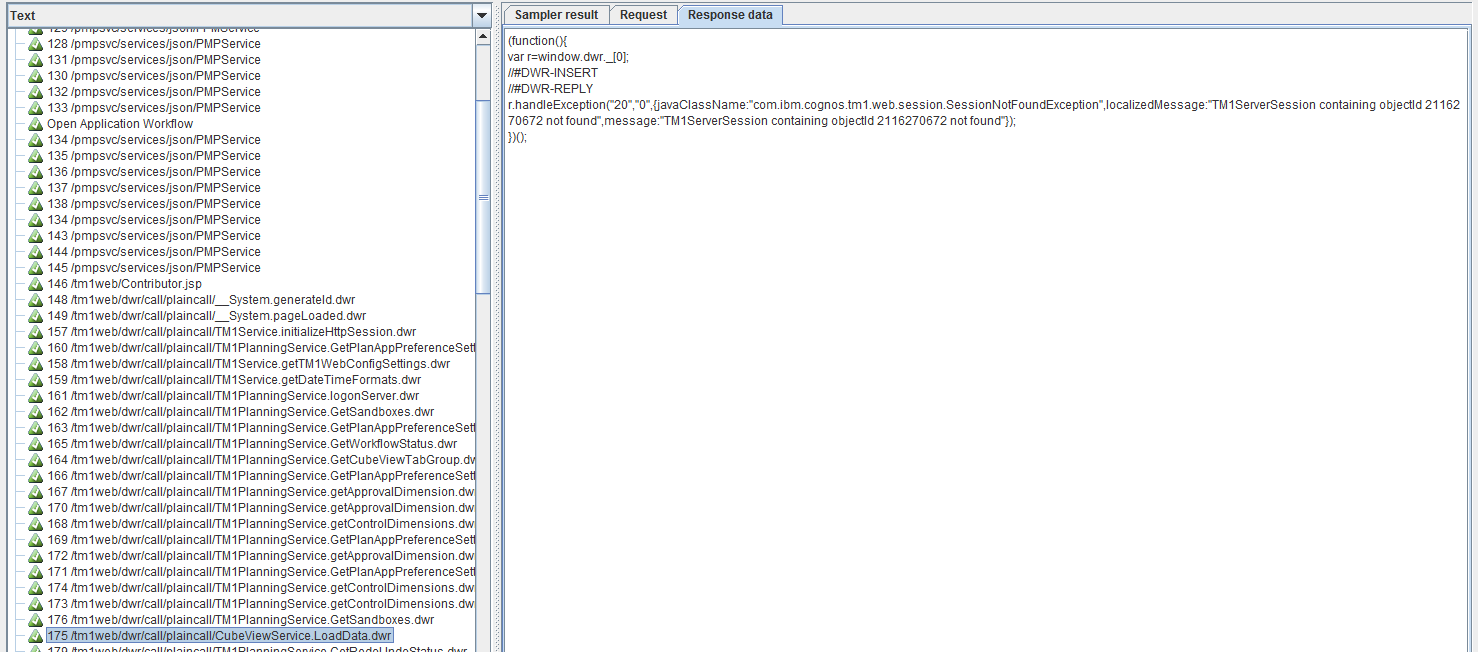
When we open contributor node, DWR creates a unique session that will be used for all following actions, so we’d need to grab this value and use it in all following calls. 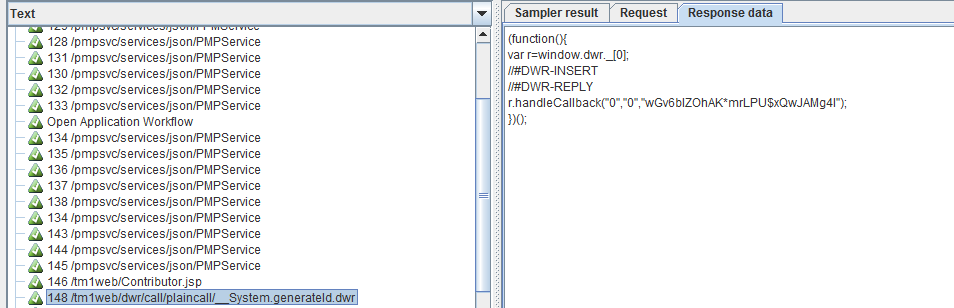
This is what we’re doing with a nifty regex just after this system id is generated:
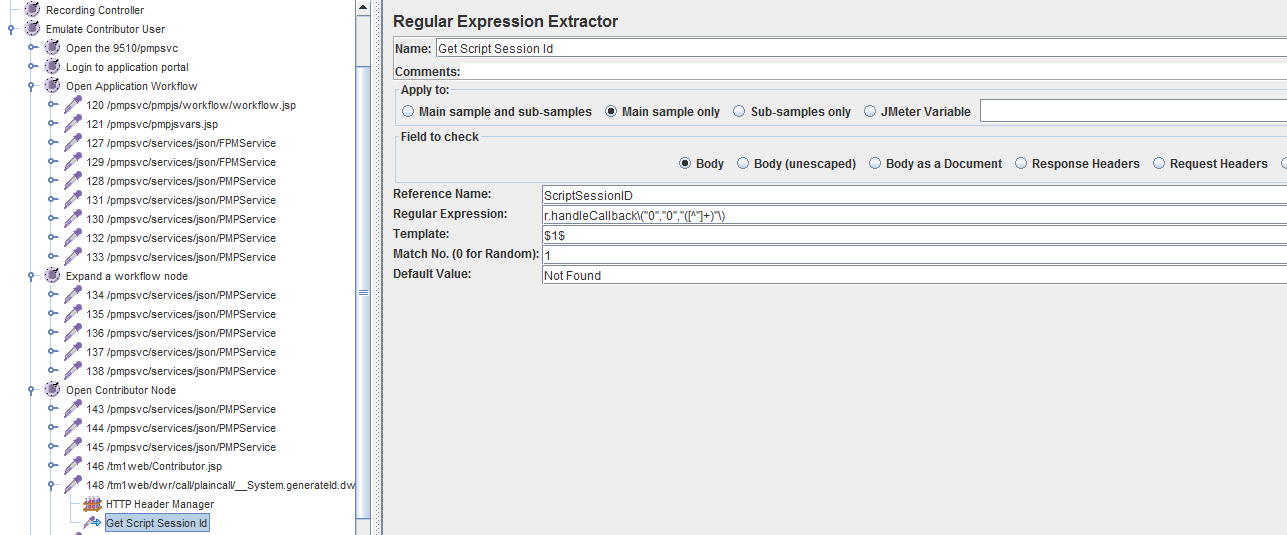
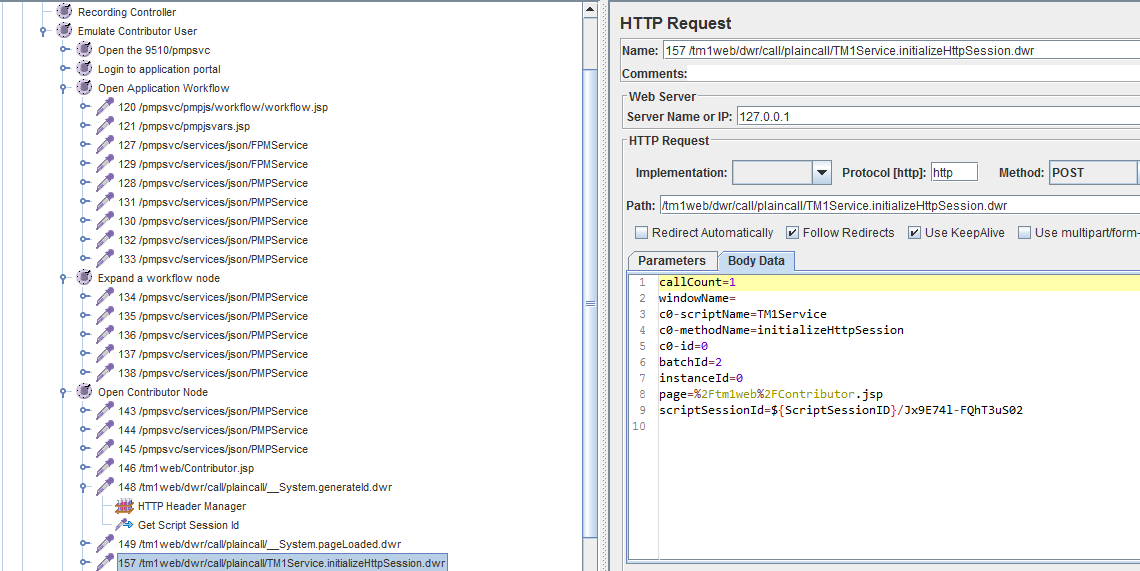
Then we add it to all calls we’re issuing (I honestly don’t have any clue about the second part of the session id, it can be anything from what I’ve seen so far).
The next trick is to get the view ids for each tab in the application. Thankfully we have this ready available in the GetCubeTabGroup.dwr: 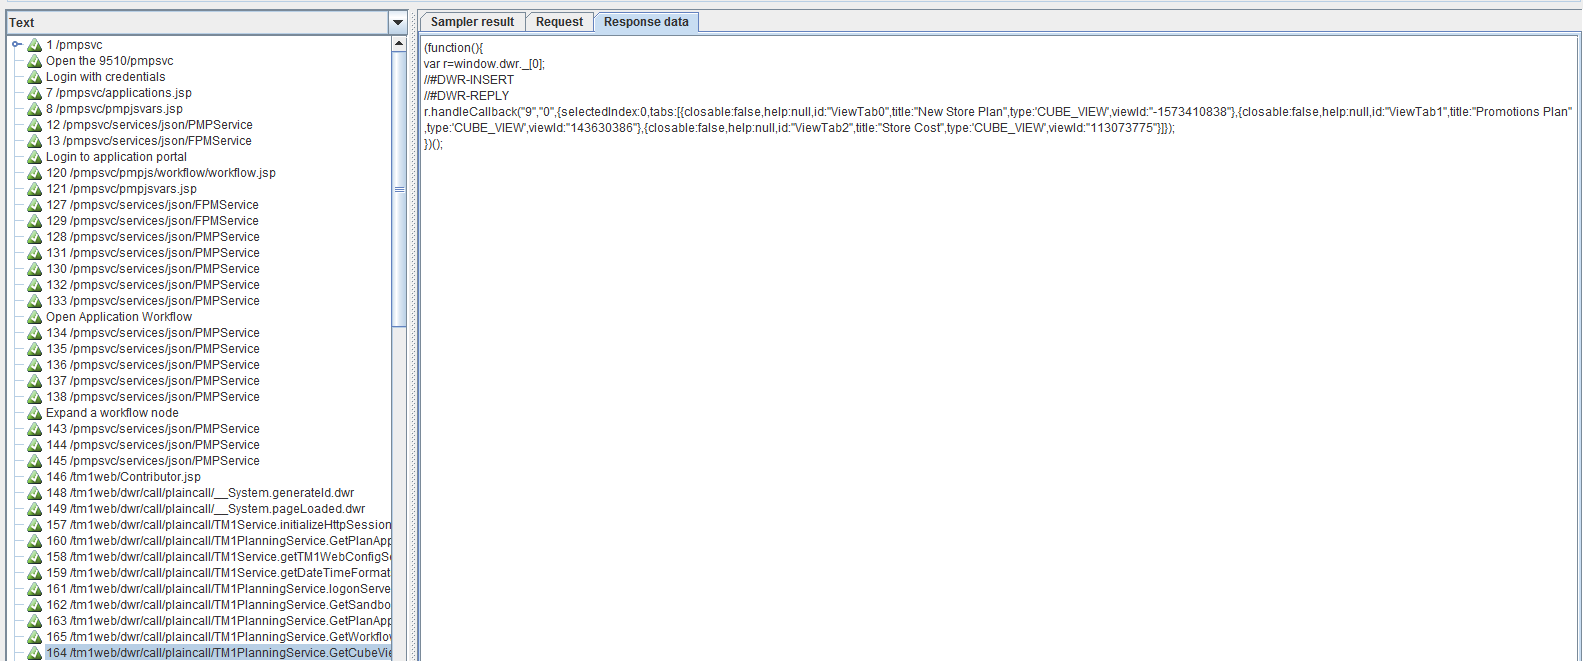
These dynamic temporary views are also something stored in session cookies (in case you ever need this information)
So the Store Cost view id should be dynamically extracted from this response. This isn’t very complicated with our regex magic: 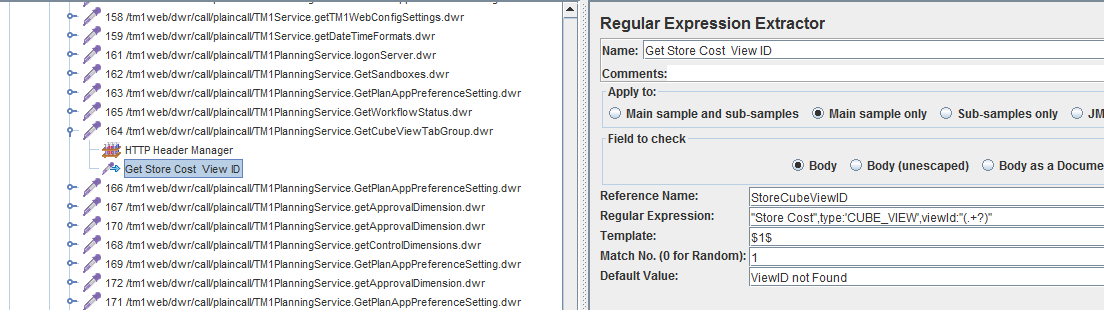
Just in case, the expression itself:
"Store Cost",type:'CUBE_VIEW',viewId:"(.+?)"
This temporary view id is used in almost all cube data-related calls (CubeViewService) as c0-param0:
So we substitute it with our newly generated StoreCubeViewID 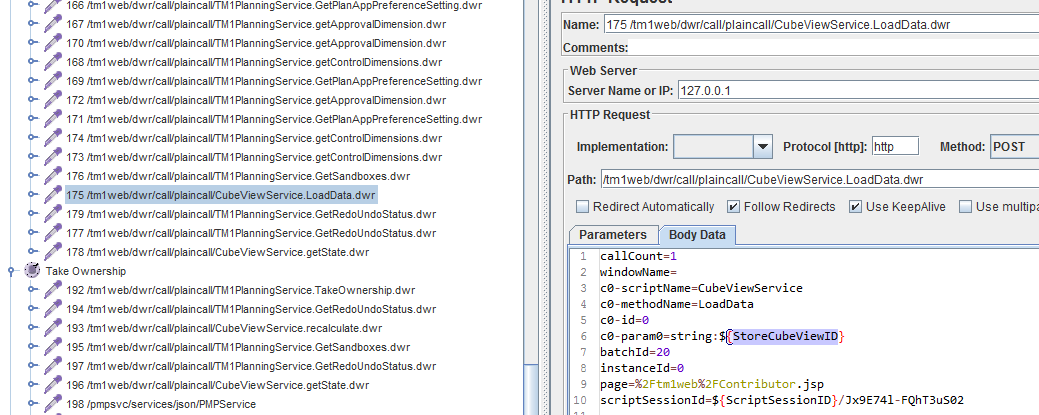
After we run Jmeter now, you can see that LoadData is returning values now: 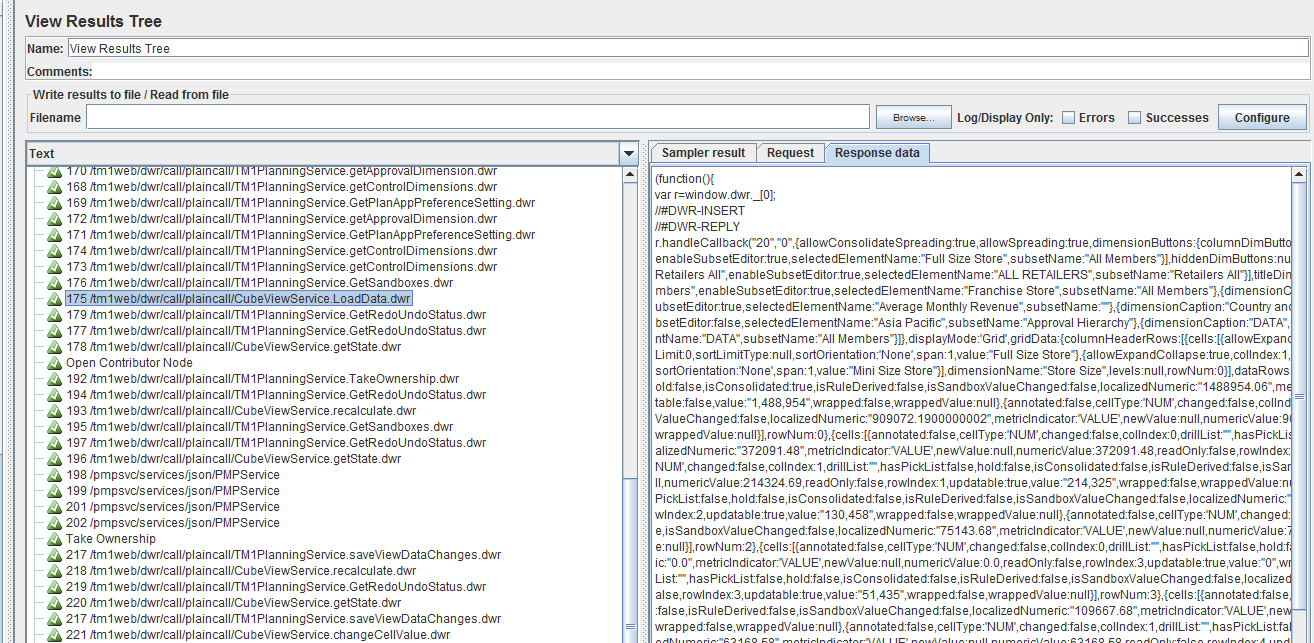
And data gets updated in the Store Costs cube: 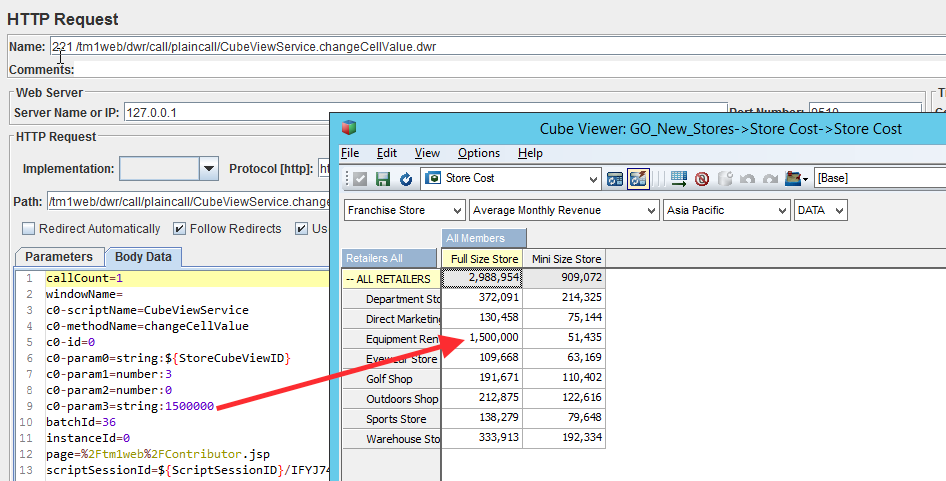
That concludes this portion of the story, we have a script that emulates user logging in, taking ownership and changing 1 cell. I know it’s been long and tedious, but we’ll now quickly build it up, trust me :)
You can download the script for this part here: DataEntryScript1
And we’ll continue with
Randomising data input
To make things more interesting, let’s input multiple values randomly. To do so, we just add the Random Function to pick both coordinates and value: 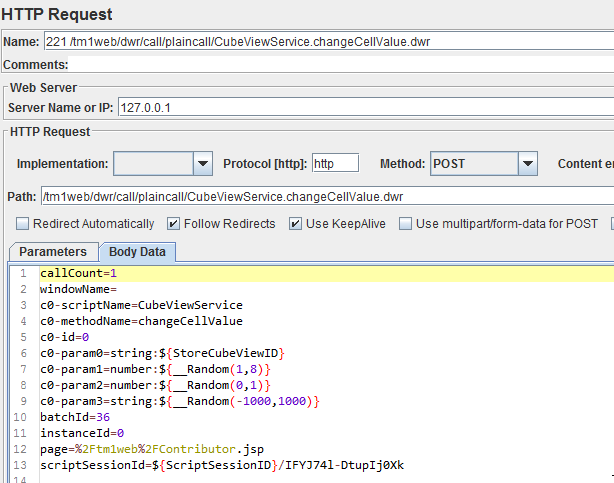 easy enough?
Now let’s make the number of changes also random. This is easy to do with Loop Controller where number of iterations is also random.
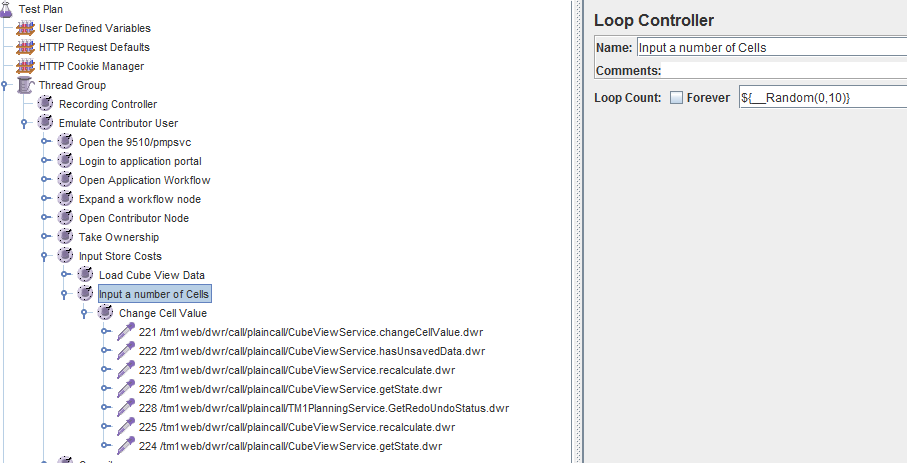
Now if we run the script (DataEntryScript2), it changes up to 10 random cells. You can see that the script itself is also getting a bit of a better shape )
Good time to add some variables and
Run the script with multiple users
Let’s start by parametrising some global things: 
And again some mass replace in the text editor to make things more generic.
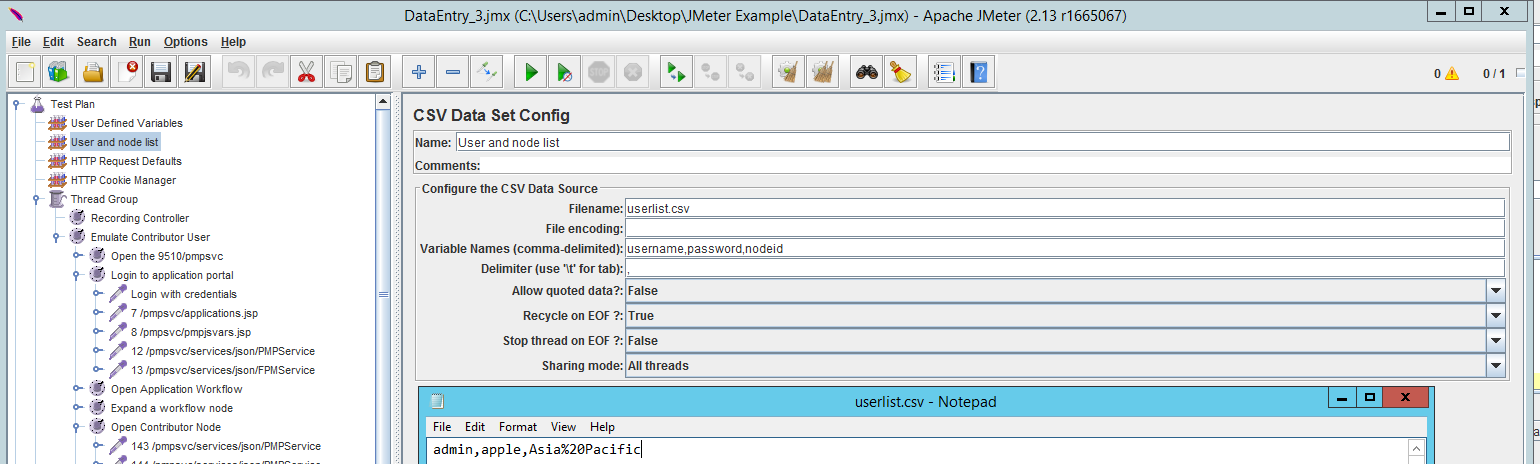
With user names and passwords it’s a bit easier to use a csv file to allow adding more users later.
We’ll create a file with following columns:
- username
- password
- application node to edit
and then we add a CSV Data Set Config to make JMeter read this file when running tests.
The way JMeter will work is that it’ll grab the row for every thread (user session) we’ll run, so we need to add more users and nodes here.
Changing the script to use this variables should be a piece of cake by now )
And all the node references are substituted by ${__urlencode(${nodeid})}, where url encode function takes care of any non HTML compliant symbols in node names. Like spaces in our ‘Asia Pacific’ example.
Let’s add a few more users to the server. Simple TI like this would do just fine, with this in Prolog:
# add users
i = 10;
while (i>0);
AddClient('user' | NumberToString(i));
i = i - 1;
end;
Epilog — you might change the group to something you use to secure the applications at the moment
# assign users to ADMIN group -- adjust for your security settings
i = 10;

while (i>0);
AssignClientToGroup('user' | NumberToString(i), 'ADMIN' );
i = i - 1;
end;
Now we can change the file to have a few users working in parallel (we can only have 6 as there are only so many nodes in the sample application). 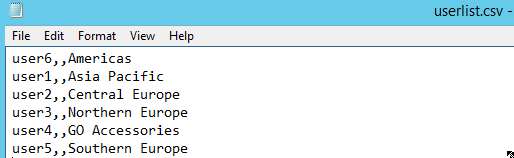
Let’s also add a small timer between inputs so that we have a bit longer time to see the threads: 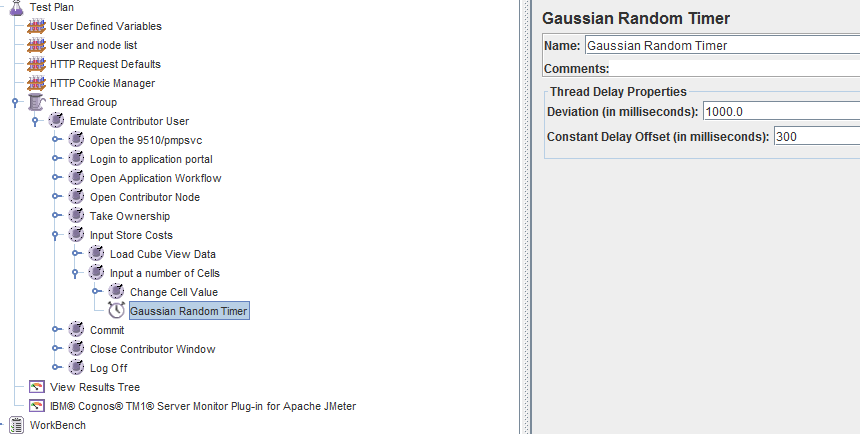
And let’s run multiple users in parallel. I usually add more realistic Ramp Up periods and play with Loop Counts in real testing.
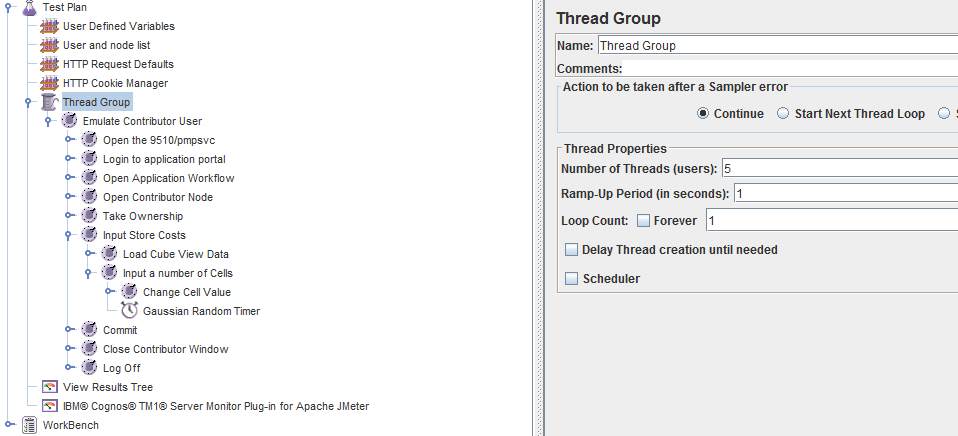
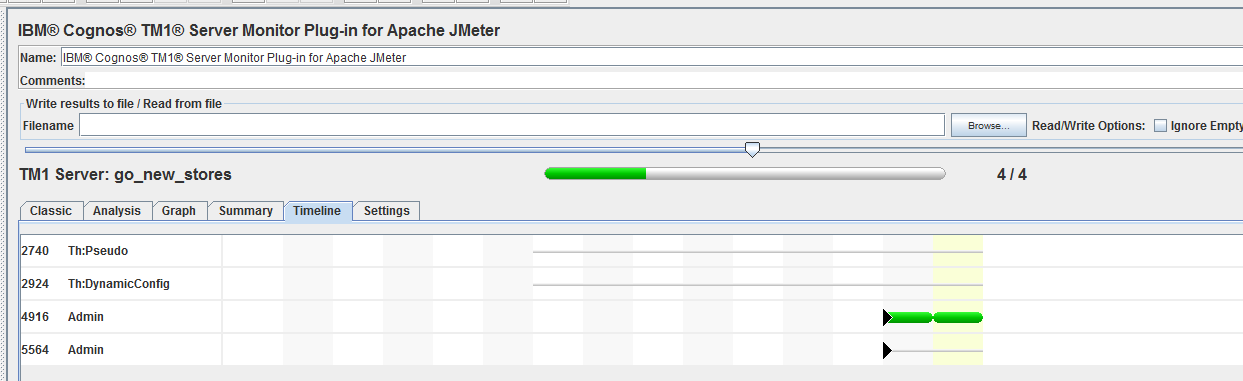
Looks working: 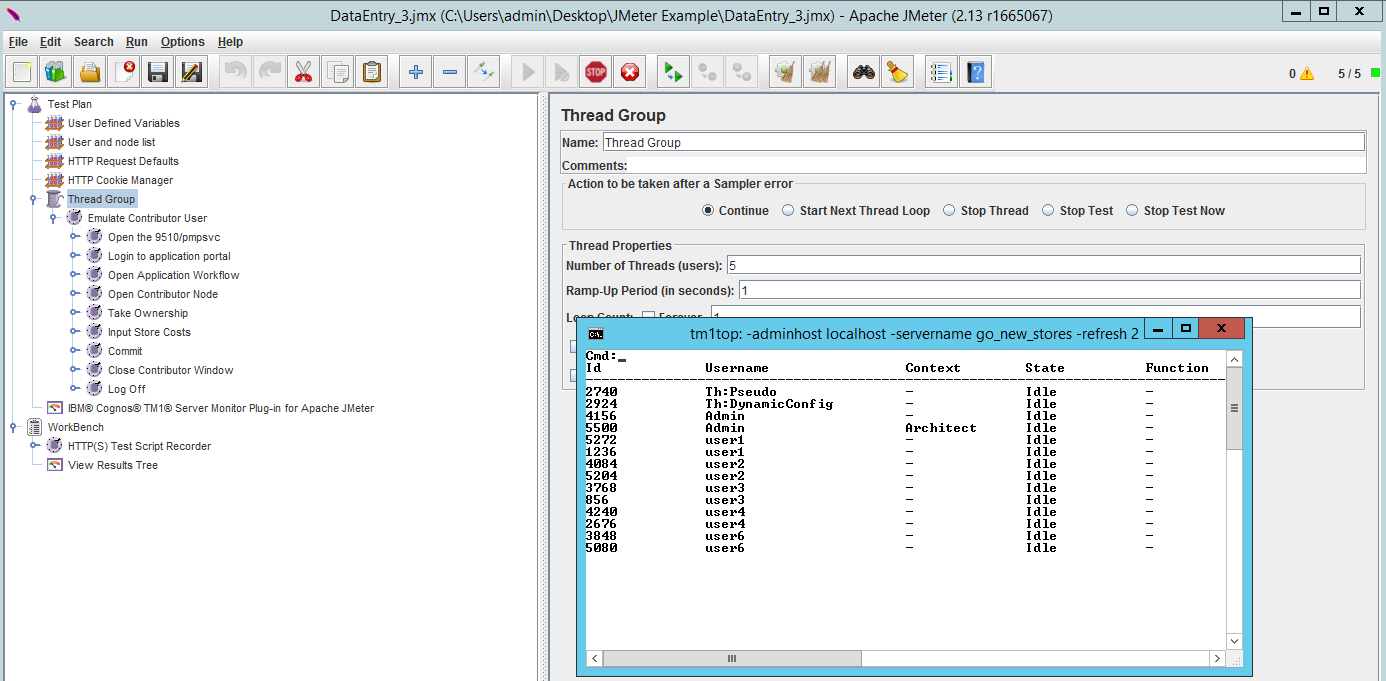
And same picture from TM1 Plugin Monitor:
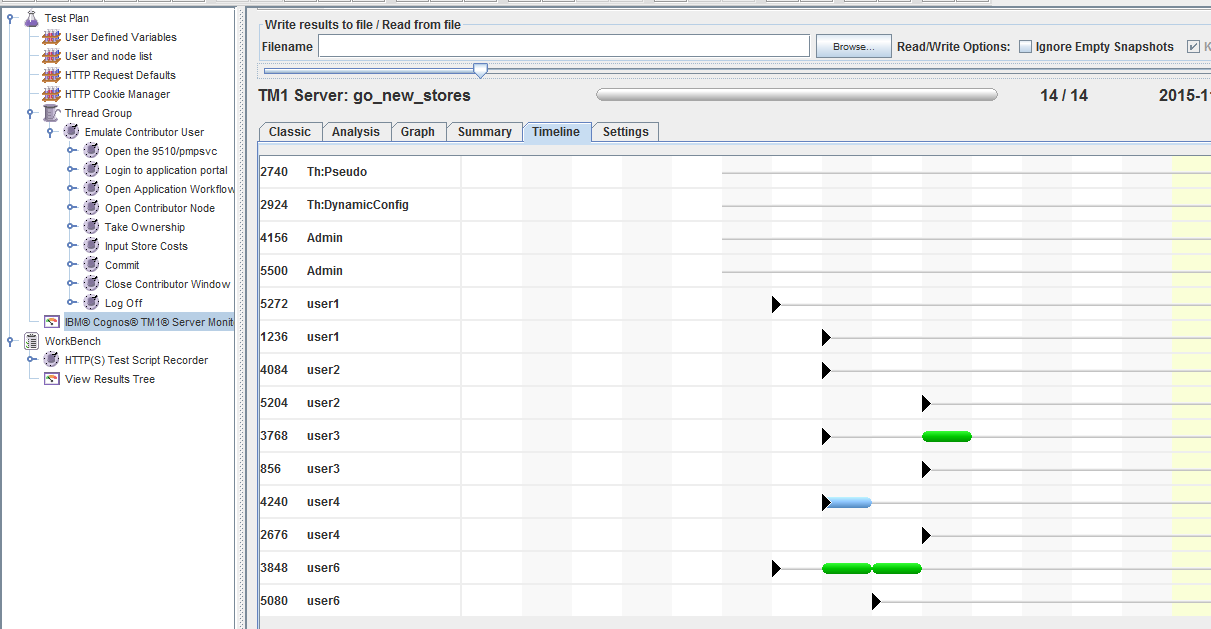
This is some serious achievement (my fingers are already worn out from typing), here’s the latest script: DataEntry3.
The only other improvement would be to input other tabs as well and for that we need to
Input data in pick lists
So the first tab in the application ‘New Store Plan’ is quite interesting. It contains only pick lists that define the type and quantity of the stores to be open in the region:
Let’s try to randomise input in this tab as well. If we record the calls to server again, we can see that there are 2 calls:
- one to return the list of picklist values

- another one to input one of them, but that’s the same one as for Numeric values in Store Costs, just the data type of our input would be String
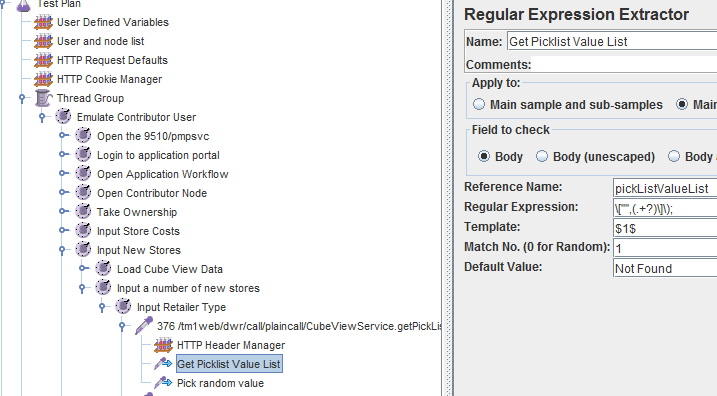
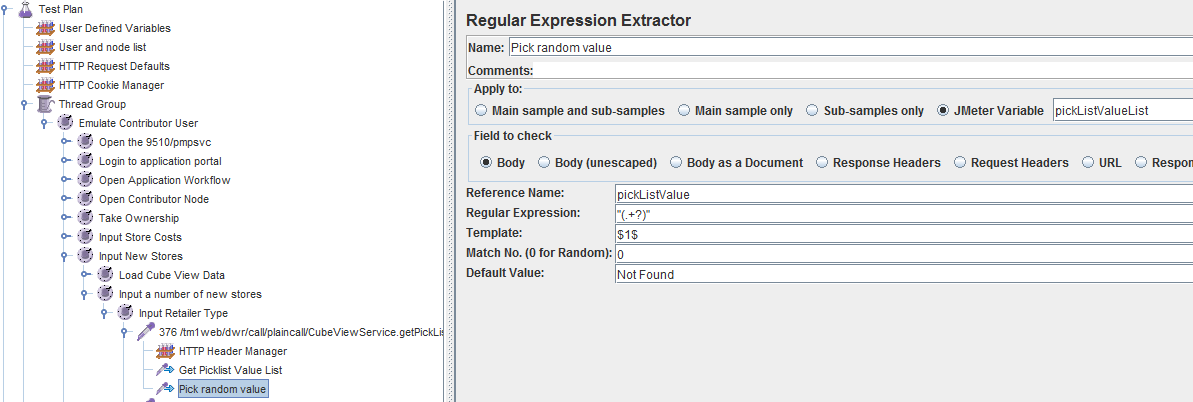
What I then do is randomise the pick list selection, so what I do is grab the list of values from getPickList.dwr and then select a random value from that list.
I do it with 2 regular expressions (I know it should be doable in one, but I’m too lazy to do it). So it looks like this:
- Get the list of picklist values:
- Select the random value
You can do loops and more clever coordinates selection, but I think that’s something you need to tailor for your application and usage pattern.
So here’s the final script and if we run it, we have 6 users working in parallel and hammering in data: 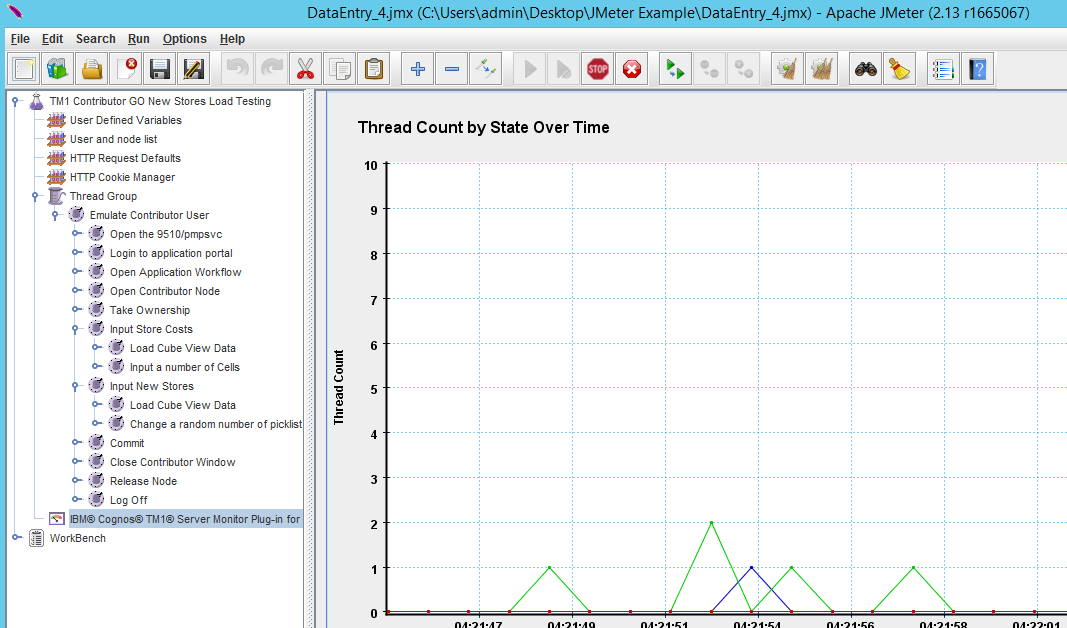
Wrap-Up
So this way you can JMeter to emulate concurrent user load on your TM1 Contributor application. You can use it to ensure that your current infrastructure or model will go through the ‘curtains opening’ without any trouble. You can also use it to ensure that you’ve got optimal server capacity (quite important with PVU licensing).
Hope you find this helpful, I definitely didn’t expect to spend this much on typing it in.
All the scripts are here:
- LoginScript1
- LoginScript2
- DataEntryScript1
- DataEntryScript2
- DataEntryScript3
- DataEntryScript4
- UserList
If there’ll be any demand I might do the same for Websheets, but at the moment I’ll have a blogging break )